|
|
Vision Installation |
|
|
Vision Installation |
Cabling Requirements (Vision Controller multi stream to multi screen max 4 per VC)
VGA moulded cable From video card to Video extender (supplied)
LAN shielded cat 5 from the VC Office PC to point where Screen(s) is positioned (Cat 5 min 20m to Max 100m)
VGA moulded cable from 2nd video extender (mounted behind screen) to LCD/Plasma
Note: where a screen is located < 30m from VC a direct VGA cable can be utilised.
Cabling Requirements (Vision Controller single stream to multi screen max 4 per VC)
Same cabling as above this gives the flexibility to expand to multi stream without extra outlay in cabling and hardware.
Vision Controller (VC) is a desktop with 4 Video output.
Specification Minimum:
Vision Controller : Asus P5W-DH-DELUXE
2 x PCI Express x 16 slot for discrete graphics cards
2 X Gigabit LAN, 2 X IEEE1394
Intel Core2 Duo E6400, 2.13GHz CPU
2GB(2 X 1GB) DDR2-533 Ram Dual Channel Memory
250GB HDD Western Digital WD250KS, 16mb Cache, 7200rpm SATA2 Drive
Hard disk Heatsink
1.44MB 3.5” Floppy Disk Drive
Pioneer DVR-111D Dual Layer Burner
Foxconn 483 Black Medium Tower Case with ISO-500L, 420W Silent PSU
2 X Asus GF7600GS SLN, 256MB, HDTV OUT, DVI, PCI-EX
Microsoft Windows XP Pro
Connectivity:
XGA
Audio In/Out
USB x 2
Wi-Fi 802.11 B/G
LAN 10/100
Video Extender up to 4 per VC
Video Extender Connectors (VE-150L/R):
VE150L/R video extender comprises a local transmitting unit and a remote receiving unit which are connected by standard Cat 5 cables. The distance of both units can be extended up to 150m. It is ideal for factories and construction sites, or any location where the display may need to expose in a risky setting, but you want the system to be kept in a safe location.
Uses Cat 5 cable to connect the local and remote units
Supports a local and a remote display.
Uses economical, reliable Category 5 Ethernet cable to connect the local and remote units.
Long distance transmission - up to 150m (500').
16 position adjustable video gain control to compensate for distance.
Supports VGA, SVGA, XGA, SXGA and Multisync monitors.
Supports DDC for the local monitor.
Easy installation
High video resolution - up to 1280 x 1024 at 150 m (500 )
OS Compatibility: WIN98, WIN ME, WIN 2K, WIN 2003, WIN XP, LINUX, Mac OS 8.6/9/10 and SUN Solaris 8/9
Alerts/Warnings:
Note: H&L recommends using a minimum of 20m of Cat5 cable to connect the local unit to the remote unit.
LCD/Plasma screen to be supplied by customer
(Optional) TV Tuner to be built in to TV
Remote enabled
Minimum resolution 1024x768
Must have XGA/VGA input
Must be monitor capable
VNC or WinConnect to be loaded on VC for support as per standard H&L configuration.
Note for this process to occur broadband internet must be available and online.
The information for the portal setup should be derived from the Zen Global Registration Form.
Log on to the company/vision URL.

Go to Menu>Sites>Sites>Site Contacts>Site Name>Terminals>Create Terminal. Assign the Terminals for the Vision Streams as per pre-registration form. Click on Save after each terminal setup.

Once all terminals are setup you are now ready to load the software on to the Vision Server.
Configure VC PC on to the customers LAN and put in position. Ensuring VNC has been loaded, firewalls disabled.
From (Web enabled) VC open up the Internet Browser.
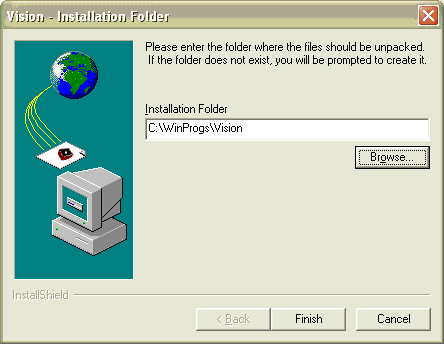
Go to URL http://vision.systraq.com/download/VisionWebInstaller.exe and save to C:\Winprogs\Vision (this folder will need to be created). Ensure the ‘Close this dialog……’ check box is unticked. This then prompts the installer to be run.


When download is complete click on Run, this will start the installation process. Follow the prompts.

The installer will be prompted to enter (from the Zen Global Registration Form) the following:
Global Site ID
Location ID
Terminal Number (this for a unique identifier for each of the separates streams that will run as per configuration. This may up to four streams on one screen or 4 streams on 4 individual screens). To disable a stream set the terminal number to ‘0’.
URL Directory – this is where vision stores and reads the URLS. Click on Submit.

Insert the Host; upload URL and port number from the registration form. Click on Submit.

Insert the Registration Name and Key and click on Submit.

Set screen parameters:
Screen Top and Left will always be set to zero
Screen Height and Width will be determined by screen resolution
URL Control File this is the file name for the list of URL’s for the respective stream
Click on Submit.

Close installation Screen and Vision will start.
Note: this process has created a folder C:\Vision on the VC with the relevant executables and shortcuts. This process must be run on all Vision Controllers.
For existing Zenith sites all that is required is re-registration and the same process above.
Configuration / Control of the Vision Screens
Click on to Vision Controller Icon in the system tray or desktop short
cut. 
This screen is used to alter the position of the Vision display for one or multiple streams, screen resolution or to close vision.
Submit: commits any changes
Start: manually starts the Vision
Stop: stops the vision from changing (schedule)
Close: terminates the Vision session.
Minimizing returns this screen to the system tray.
